
- understanding-the-problem-why-chocolate-breaks-at-home-melting-and-handling-mistakes
- tools-and-ingredients-you-need-for-melt-and-remold-chocolate-bar-repair
- step-by-step-melt-and-remold-process-for-broken-chocolate-bars
- fixing-texture-and-shine-how-to-restore-professional-quality-chocolate-finish
- common-mistakes-when-repairing-chocolate-and-how-to-avoid-them
- real-life-kitchen-story-saving-a-dessert-after-a-chocolate-disaster
- storage-tips-and-creative-uses-for-repaired-chocolate-bars
When Chocolate Breaks in Your Hands: What’s Really Happening
Anyone who has ever opened a perfectly good chocolate bar only to hear that frustrating snap in the wrong place knows the feeling. Broken chocolate doesn’t just look messy—it feels like the dessert experience is ruined before it even begins. But the truth is, learning how to repair broken chocolate bars is not only possible, it can actually make you better at working with chocolate overall.
Chocolate is a delicate structure made of cocoa solids, cocoa butter, and sugar crystals. When it breaks, it usually means the crystal structure has already been stressed—either by heat changes, poor storage, or simple pressure. Once you understand that, the idea of fixing it through melt and remold chocolate techniques starts to feel a lot less like “magic” and more like basic kitchen chemistry.

Chocolate Springs Cafe / chocolate springs lenox massachusetts
LenoxBerkshire CountyMassachusetts
55 Pittsfield Rd, Lenox, MA 01240, USA
Why Chocolate Breaks Easily and How You Can Prevent It
Most broken chocolate issues happen long before the actual snap. Temperature fluctuations are the biggest culprit. If chocolate is stored in a warm room and then suddenly cooled, the cocoa butter structure becomes unstable. This leads to brittle sections that crack unevenly.
Another common issue is improper handling during transport or packaging. Even premium chocolate bars can suffer micro-cracks that eventually turn into full breaks. Professional chocolatiers often account for this by controlling humidity, temperature, and cooling speed carefully.
Understanding these causes helps you approach homemade chocolate repair more strategically instead of just reacting after the damage is done.

Droolin Moose / droolin moose
St. Louis ParkHennepin CountyMinnesota
5007 Excelsior Blvd, St Louis Park, MN 55416, USA
What You Need Before You Start the Melt and Remold Process
Before jumping into fixing your broken chocolate, preparation matters more than most people expect. You don’t need professional equipment, but you do need consistency in your setup.
A heat-safe bowl, a double boiler setup (or a microwave in short bursts), a silicone mold or parchment paper, and a spatula are usually enough. The key is controlling heat gently. Chocolate burns easily, and once it scorches, it loses both flavor and texture stability.
Many home cooks underestimate how important slow melting is. If you rush this step, you risk turning a simple chocolate bar restoration into a grainy, dull mess instead of a smooth remolded finish.
Step-by-Step Guide to Repair Broken Chocolate Bars
Step 1: Break It Down Intentionally
Even if your chocolate is already broken, you should break it into smaller, evenly sized pieces. This ensures it melts consistently. Uneven chunks melt at different speeds, which leads to clumping or burning.
Step 2: Gentle Melting Process
Use a double boiler or microwave in short 10–15 second intervals. Stir constantly. The goal is not speed but control. You want a smooth, glossy liquid without overheating the fats.
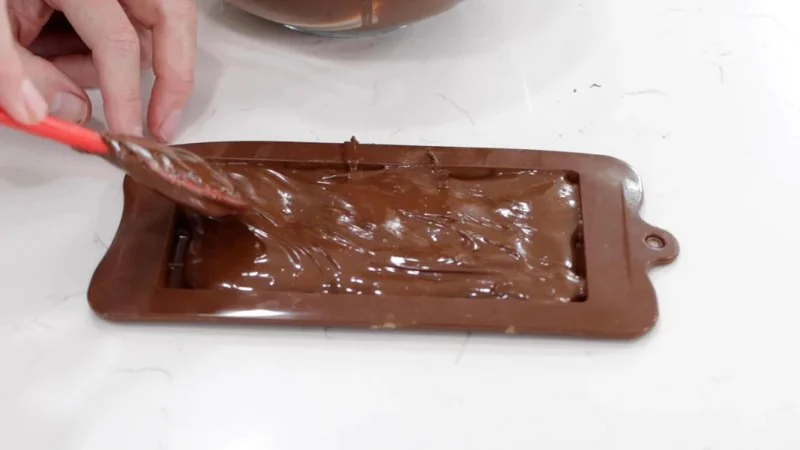
Step 3: Remolding the Chocolate
Once fully melted, pour the chocolate into molds or onto parchment paper. If you're restoring a bar shape, lightly tap the mold to remove air bubbles. This is where melt and remold chocolate techniques really shine.
Step 4: Cooling the Right Way
Place the mold in a cool, dry area—not the freezer immediately. Rapid cooling can cause blooming, where white streaks appear on the surface. Patience here directly affects the final quality.
How to Restore Shine and Smooth Texture Like a Professional
One of the biggest differences between homemade chocolate repair and professional chocolate is appearance. Professionals often rely on tempering, which aligns cocoa butter crystals for a glossy finish.
While full tempering can be complex, you can still improve shine by stirring melted chocolate consistently as it cools slightly before molding. This small step helps stabilize the structure.
If your chocolate looks dull after setting, it doesn’t mean it’s ruined—it just means the crystal structure didn’t align perfectly. It will still taste great, even if it lacks that bakery-style gloss.
Common Mistakes That Turn Simple Fixes Into Chocolate Failures
The most common mistake is overheating. Once chocolate exceeds a certain temperature threshold, it becomes grainy and nearly impossible to restore.
Another issue is introducing water. Even a tiny drop can cause “seizing,” where chocolate turns thick and unusable. This is one of the fastest ways to ruin your repair process.
Lastly, rushing the cooling phase often leads to uneven texture. Many people try to freeze chocolate quickly, but this disrupts the fat structure and reduces quality.
A Real Kitchen Story: Turning a Broken Dessert Into Something Better
A home baker once shared how she prepared chocolate-dipped strawberries for a small gathering. Just before serving, the chocolate slab she had prepared cracked into uneven pieces due to improper cooling. Instead of starting over, she melted everything down again and remolded it into small bite-sized chocolate squares with sea salt.
What was initially a “failure” turned into the highlight of the dessert table. Guests actually preferred the new version. This is the hidden benefit of knowing how to repair broken chocolate bars—you don’t just fix mistakes, you sometimes create something better.
For people who love experimenting with desserts, platforms like Gaias Candy often share inspiration and ingredient ideas that help elevate simple fixes into creative kitchen upgrades.
Creative Ways to Use Repaired Chocolate Beyond Just Bars
Once you’ve mastered melt and remold chocolate techniques, you can start thinking beyond restoration. Repaired chocolate can be turned into bark, drizzle toppings, dessert decorations, or even hot chocolate bases.
Crushed remolded chocolate can also be mixed into cookie dough or brownie batter for extra texture. Instead of seeing broken chocolate as waste, it becomes a flexible ingredient for experimentation.
This mindset shift is what transforms basic kitchen skills into real cooking creativity.
Why Learning Chocolate Repair Actually Improves Your Baking Skills
Understanding chocolate behavior teaches you patience, temperature control, and ingredient sensitivity. These skills transfer to baking, candy-making, and even pastry decoration.
Once you’ve successfully fixed chocolate a few times, you start recognizing heat patterns and texture changes instinctively. That awareness is what separates casual cooking from more advanced dessert preparation.
And once you reach that level, broken chocolate stops being a problem—it becomes an opportunity.


 Marsha's Homemade Buckeyes4.0 (30 reviews)
 Orne's Candy Store4.0 (39 reviews)
 House of Chocolate4.0 (75 reviews)
 Coco's Confections4.0 (1 reviews)
 M&M’S Mall of America4.0 (457 reviews)
 Van Otis Truffles4.0 (74 reviews)
 Top Candy Shops for Tourists in New York – Best Sweets and Treats
 Best Candy Shops in New York - A Sweet Adventure Through the City
 How to Make Candy-Themed Crafts for Christmas Gift Giving
 How to Make Chocolate-Covered Strawberries for Kids: A Fun and Easy Recipe
 How to Make Easy Gummy Worms at Home | Homemade Candy Recipes
 How to Host a Candy-Themed Movie Night | Fun and Sweet Ideas