
How to Make Homemade Chocolate-Covered Marshmallows
Chocolate-covered marshmallows are a delightful treat, combining the creamy sweetness of marshmallows with the rich, velvety taste of chocolate. Whether you’re looking to create a simple snack, a gift for a loved one, or an indulgent addition to your next dessert table, learning how to make homemade chocolate-covered marshmallows is a fun and rewarding experience.
In this guide, we’ll walk you through the process of making these delicious treats from scratch, offering tips for perfecting the recipe and ideas for customizing your chocolate-covered marshmallows. It’s an easy, customizable treat that anyone can enjoy!
- 1. Ingredients and Tools Needed
- 2. Step-by-Step Instructions for Making Chocolate-Covered Marshmallows
- 3. Tips for Perfecting Your Chocolate-Covered Marshmallows
- 4. Customizing Your Chocolate-Covered Marshmallows
- 5. Real-Life Example: Making Chocolate-Covered Marshmallows for a Special Occasion
1. Ingredients and Tools Needed
Before you get started, make sure you have all the necessary ingredients and tools. Here’s what you’ll need:

Escazu Chocolates / escazu chocolates
RaleighWake CountyNorth Carolina
2409 Crabtree Blvd Suite 124, Raleigh, NC 27604, USA
Ingredients:
- 1 package of marshmallows (large or mini)
- 1 to 2 cups of chocolate (dark, milk, or white chocolate, depending on your preference)
- 1 to 2 tablespoons of vegetable oil or coconut oil (optional, for smoother chocolate coating)
- Optional toppings: crushed nuts, sprinkles, shredded coconut, or crushed cookies
Tools:
- Microwave-safe bowl or double boiler
- Wooden skewers or forks for dipping
- Wax paper or parchment paper for cooling
- A baking sheet or tray
2. Step-by-Step Instructions for Making Chocolate-Covered Marshmallows
Now that you have all your ingredients and tools ready, follow these simple steps to make your own chocolate-covered marshmallows:

The Ganachery / the ganachery
Lake Buena VistaOrange CountyFlorida
1486 East Buena Vista Drive, Disney Springs, Town Center, Lake Buena Vista, FL 32830, USA
2.1 Melt the Chocolate
Begin by melting your chocolate. You can do this using a double boiler or microwave. If using a microwave, place the chocolate in a microwave-safe bowl, and heat it in 20-second intervals, stirring in between until the chocolate is fully melted and smooth. Add a tablespoon of vegetable or coconut oil to make the chocolate coating even smoother.
2.2 Prepare the Marshmallows
While the chocolate is melting, line a baking sheet or tray with wax paper or parchment paper. This will be the surface where your chocolate-covered marshmallows will cool and harden. If you want to add toppings, make sure they are ready to go, such as crushed nuts or sprinkles.
Next, insert a wooden skewer, fork, or lollipop stick into each marshmallow. This will make it easier to dip them into the chocolate and handle them while decorating.
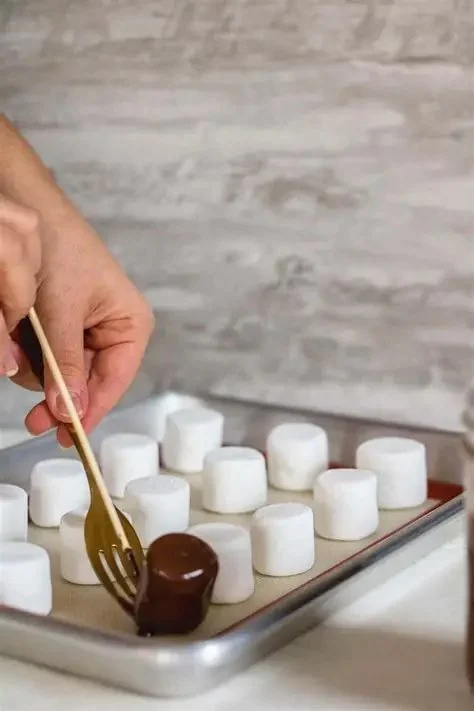
2.3 Dip the Marshmallows in Chocolate
Once the chocolate is melted and smooth, dip each marshmallow into the chocolate. Hold the marshmallow by the stick and swirl it around to coat it evenly. You can dip the marshmallow halfway or completely, depending on your preference. If you like a thicker chocolate coating, you can dip the marshmallow multiple times.
2.4 Add Toppings
If you want to add toppings, this is the time to do it. While the chocolate is still wet, roll or sprinkle the marshmallow in your desired topping, such as crushed nuts, sprinkles, or shredded coconut. This adds extra flavor and texture to your chocolate-covered marshmallows.
2.5 Let the Chocolate Set
Place the dipped marshmallows onto the prepared baking sheet. Let them cool at room temperature or place them in the refrigerator for faster setting. In about 20 minutes to an hour, the chocolate will harden, and your marshmallows will be ready to enjoy.
3. Tips for Perfecting Your Chocolate-Covered Marshmallows
To ensure your chocolate-covered marshmallows turn out perfectly every time, here are some helpful tips:
3.1 Use High-Quality Chocolate
The quality of your chocolate plays a significant role in the final flavor. Choose a high-quality chocolate that melts smoothly and has a rich, delicious taste. Dark, milk, or white chocolate all work well, so pick what suits your taste preferences.
3.2 Make Sure the Marshmallows Are Dry
Before dipping, ensure that your marshmallows are dry. If they’ve been sitting out for a while, moisture from the marshmallows can cause the chocolate to seize and not coat as evenly.
3.3 Experiment with Toppings
Get creative with your toppings! You can use crushed candy, graham cracker crumbs, or even mini chocolate chips. The possibilities are endless, so have fun customizing your chocolate-covered marshmallows.
4. Customizing Your Chocolate-Covered Marshmallows
One of the best things about homemade chocolate-covered marshmallows is how customizable they are. Here are some ideas to make your treats stand out:
4.1 Flavor Variations
Experiment with different types of chocolate and fillings. You can make s’mores-inspired marshmallows by adding a layer of peanut butter or Nutella before dipping them in chocolate. Or, try infusing the chocolate with different flavors such as mint, orange, or even chili for a spicy kick.
4.2 Fun Shapes
If you’re feeling adventurous, you can also try using cookie cutters to shape your marshmallows before dipping them. Heart shapes for Valentine’s Day, star shapes for a party, or fun seasonal designs like pumpkins or Christmas trees are all great ways to customize your chocolate-covered marshmallows.
5. Real-Life Example: Making Chocolate-Covered Marshmallows for a Special Occasion
Take the example of Lisa, who wanted to create a unique treat for her daughter’s birthday party. She decided to make chocolate-covered marshmallows in fun shapes with vibrant toppings like rainbow sprinkles and edible glitter. The marshmallows were a huge hit at the party, and the guests couldn’t stop raving about how delicious they were. Not only did Lisa save money by making them at home, but she also got to customize them to her daughter’s favorite colors and flavors, making the party extra special.


 Chocolate Place4.0 (311 reviews)
 Captain's Chocolate Co.4.0 (105 reviews)
 Mad Candy4.0 (43 reviews)
 Fralinger's Original Salt Water Taffy4.0 (145 reviews)
 Jacques Torres Chocolate - Grand Central Terminal4.0 (92 reviews)
 Harbor Sweets Copley5.0 (1 reviews)
 Top Candy Shops for Tourists in New York – Best Sweets and Treats
 Best Candy Shops in New York - A Sweet Adventure Through the City
 How to Make Candy-Themed Crafts for Christmas Gift Giving
 How to Make Chocolate-Covered Strawberries for Kids: A Fun and Easy Recipe
 How to Make Easy Gummy Worms at Home | Homemade Candy Recipes
 How to Host a Candy-Themed Movie Night | Fun and Sweet Ideas