- 1. Why DIY Candy Bouquets Make Perfect Teacher Gifts
- 2. Materials Needed to Create a Candy Bouquet
- 3. Step-by-Step Guide to Making a Candy Bouquet
- 4. Creative Candy Bouquet Ideas for Teachers
- 5. Tips for Personalizing Your Teacher Candy Bouquet
1. Why DIY Candy Bouquets Make Perfect Teacher Gifts
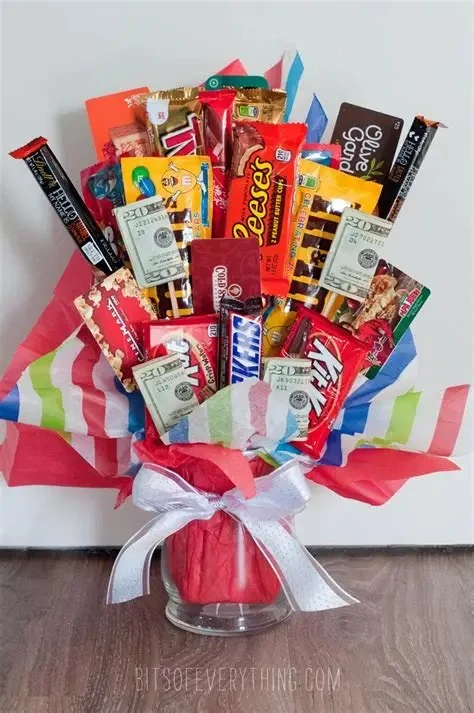
Teachers work hard every day to educate and inspire, and what better way to show appreciation than with a thoughtful, personalized gift? DIY candy bouquets are a creative, fun, and customizable way to express your gratitude. Not only are they a delicious treat, but they also offer a personal touch that can make a teacher feel truly special. Whether it's for Teacher Appreciation Week, the end of the school year, or just because, a DIY candy bouquet is a memorable and unique gift idea.
These bouquets are also versatile. You can select the candies your teacher loves most and even tailor the design to match their personality or interests. With a little creativity and some basic materials, you can craft a gift that's as sweet as your teacher’s dedication.

Schimpff's Confectionery / schimpffs
JeffersonvilleClark CountyIndiana
347 Spring St, Jeffersonville, IN 47130, USA
2. Materials Needed to Create a Candy Bouquet
Before you begin creating your candy bouquet, it’s important to gather the right materials. Here’s a list of the basic supplies you’ll need to get started:
- Candies: Choose a variety of candies. You can go with chocolates, gummies, lollipops, or even small packets of treats like cookies or granola bars.
- Floral Foam: This will serve as the base for your bouquet and will help hold the candy in place.
- Wooden Dowels or Sticks: These will act as the “stems” for your candy flowers. You can use skewers, popsicle sticks, or any other sturdy stick-like material.
- Ribbon: Colorful ribbons can add a decorative touch to your bouquet and are perfect for tying around the candy “stems” or at the base.
- Decorative Paper or Tissue Paper: This is used to wrap your bouquet and give it a professional and polished look.
- Glue Gun: A glue gun is essential for securing the candies to the sticks and attaching the decorations to your bouquet.
- Optional Decorations: You can add extras like small flowers, glitter, or personalized tags to further enhance the look of your bouquet.
3. Step-by-Step Guide to Making a Candy Bouquet
Now that you have all your materials, it's time to start creating your DIY candy bouquet! Follow these simple steps to make a beautiful arrangement.
- Prepare the Base: Start by cutting your floral foam to fit into the base of your container (such as a small vase or pot). The foam should fit snugly inside, providing a stable platform for your candy stems.
- Prepare the Candy: Attach the candies to your wooden sticks using a glue gun. For chocolates, you can use smaller wooden dowels or even popsicle sticks. For larger items like candy bars, use longer skewers or sticks to make sure they are secure.
- Arrange the Candy: Start placing the candy stems into the floral foam. Vary the heights and positions to create a balanced and visually appealing bouquet. Make sure to leave enough space between each piece so that the bouquet looks full but not overcrowded.
- Decorate the Base: Once your candies are arranged, cover the floral foam with decorative paper or tissue paper. You can also wrap it with ribbons for added flair.
- Final Touches: If desired, add extra decorations like small flowers, a personalized note, or even a card that says “Thank You” or “Happy Teacher’s Day” to make the gift more personal and meaningful.
4. Creative Candy Bouquet Ideas for Teachers
When it comes to making a candy bouquet, the possibilities are endless! Here are a few fun and creative ideas to inspire your design:
- Color Themes: Choose candies and ribbons in your teacher's favorite colors or use school colors for a more personalized touch.
- Healthy Treats Bouquet: If your teacher is health-conscious, you can make a bouquet using healthier snack options like dried fruits, granola bars, or dark chocolate.
- Seasonal Themes: Incorporate seasonal elements like autumn-themed candies in a fall bouquet or peppermint bark and red ribbons for a holiday bouquet.
- Customized Toppers: Add small items related to your teacher’s subject, such as tiny notebooks, pens, or even mini apple-shaped decorations to represent teaching and learning.
5. Tips for Personalizing Your Teacher Candy Bouquet
To make your candy bouquet truly unique and thoughtful, consider adding personalized touches. Here are some ideas:
- Personalized Note: Write a heartfelt message on a small card or tag. It could be a thank-you note for their hard work or a quote that reflects their teaching style.
- Favorite Candies: Make sure to include some of your teacher's favorite candies. This small touch can show that you took the time to think about their preferences.
- Handmade Container: If you’re feeling extra creative, consider decorating the container or vase yourself. You can paint it or add stickers to make it more unique.
Making a DIY candy bouquet for your teacher is a fun, personal, and meaningful way to show your appreciation. It’s not just a gift; it’s a creative expression of gratitude that they will surely remember. Ready to make your candy bouquet? Visit Gaias Candy for all the supplies you need to create the perfect teacher gift!


 All Things Chocolate0.0 (0 reviews)
 IT'SUGAR American Dream4.0 (227 reviews)
 The Candy Man4.0 (86 reviews)
 Lucky Leo's Sweet Shop4.0 (51 reviews)
 Dulceria La Pinata3.0 (6 reviews)
 Chocolate Decor4.0 (168 reviews)
 Top Candy Shops for Tourists in New York – Best Sweets and Treats
 Best Candy Shops in New York - A Sweet Adventure Through the City
 How to Make Candy-Themed Crafts for Christmas Gift Giving
 How to Make Chocolate-Covered Strawberries for Kids: A Fun and Easy Recipe
 How to Make Easy Gummy Worms at Home | Homemade Candy Recipes
 How to Host a Candy-Themed Movie Night | Fun and Sweet Ideas