
How to Make Easy Chocolate Bark with Nuts and Fruits
- 1. Introduction to Chocolate Bark
- 2. Essential Ingredients for Chocolate Bark
- 3. Step-by-Step Guide to Making Chocolate Bark
- 4. Creative Tips for Adding Nuts and Fruits
- 5. Storing and Serving Chocolate Bark
1. Introduction to Chocolate Bark
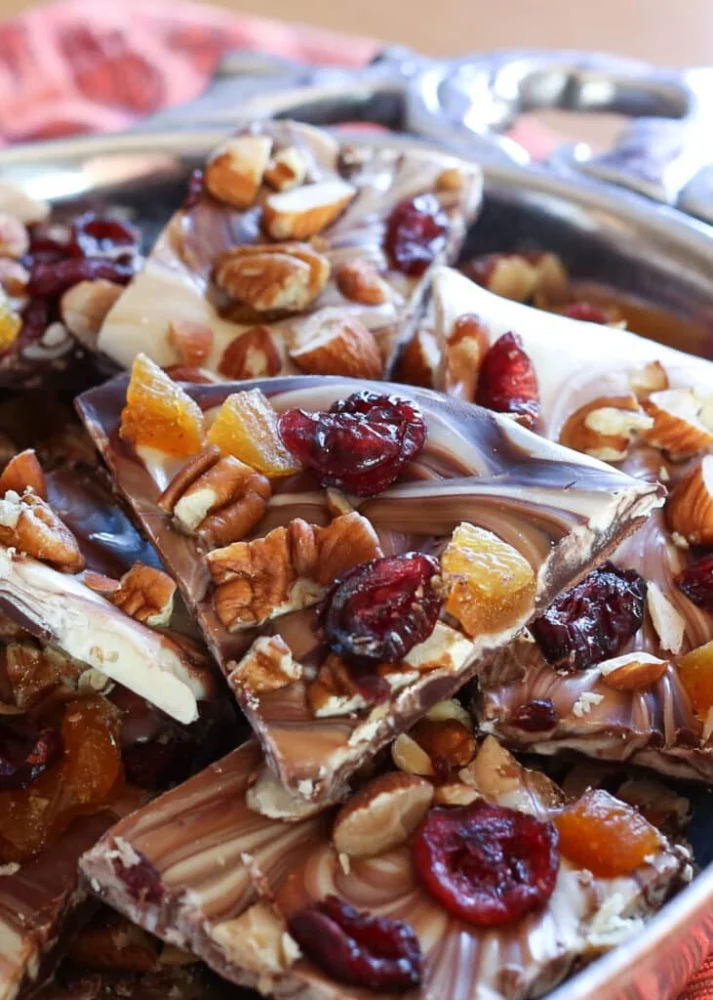
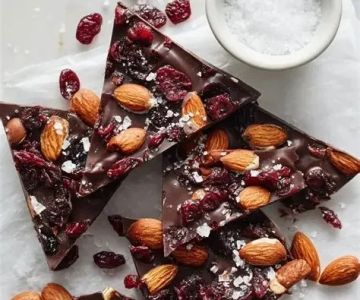
Chocolate bark is a simple, versatile, and delicious treat that combines melted chocolate with various toppings like nuts, fruits, and other ingredients. It’s a favorite for both beginner and experienced bakers because of its easy preparation and endless customization possibilities. In this article, we’ll walk you through a simple recipe for making chocolate bark with nuts and fruits, along with tips for adding creative twists and ensuring a smooth, professional finish.
2. Essential Ingredients for Chocolate Bark
Making chocolate bark doesn’t require a long list of ingredients. Here’s what you’ll need to get started:
- Chocolate: You can use any type of chocolate—dark, milk, or white—depending on your preference.
- Nuts: Common choices include almonds, walnuts, pistachios, and pecans. Feel free to mix different kinds of nuts to suit your taste.
- Fruits: Dried fruits such as cranberries, raisins, and apricots complement chocolate bark perfectly.
- Optional Add-ins: You can also add seeds, coconut flakes, or a sprinkle of sea salt for extra flavor.
3. Step-by-Step Guide to Making Chocolate Bark
Follow these simple steps to create your own chocolate bark at home:
- Melt the Chocolate: Break the chocolate into small pieces and melt it using a double boiler or microwave. Stir gently to ensure it melts evenly and smoothly.
- Prepare the Toppings: Chop your nuts and fruits into small pieces. You can toast the nuts for extra flavor if desired.
- Spread the Chocolate: Once melted, pour the chocolate onto a parchment-lined baking sheet. Use a spatula to spread it evenly into a thin layer.
- Add the Toppings: While the chocolate is still soft, sprinkle your nuts, fruits, and any other toppings over the surface. Press them down gently to ensure they stick.
- Chill the Bark: Refrigerate the chocolate bark for at least an hour to allow it to harden. Once set, break it into pieces of your desired size.
4. Creative Tips for Adding Nuts and Fruits
One of the best parts of making chocolate bark is the ability to customize it. Here are a few ideas to make your bark even more exciting:
- Mix Different Flavors: Combine sweet and savory flavors by adding a touch of sea salt or a sprinkle of cinnamon to the bark.
- Use Seasonal Fruits: Depending on the time of year, you can add seasonal fruits like strawberries, blueberries, or even orange zest for a refreshing twist.
- Experiment with Nut Butters: Swirl peanut butter or almond butter into the melted chocolate for an extra layer of flavor.
- Try Spices and Extracts: Enhance the flavor with a pinch of cayenne pepper, chili powder, or vanilla extract.
5. Storing and Serving Chocolate Bark
Chocolate bark is best stored in an airtight container at room temperature for up to two weeks. If you live in a hot climate, you may want to store it in the refrigerator to prevent melting. When serving, break the bark into bite-sized pieces and arrange them in a decorative bowl or on a plate for a beautiful presentation.


 CandyStriper3.0 (2 reviews)
 OTD Exotic Snacks5.0 (5 reviews)
 IT'SUGAR Hawaii4.0 (226 reviews)
 Wertz Candies4.0 (150 reviews)
 Exotic Sweets Shop4.0 (5 reviews)
 Candy4Less4.0 (294 reviews)
 Top Candy Shops for Tourists in New York – Best Sweets and Treats
 Best Candy Shops in New York - A Sweet Adventure Through the City
 How to Make Candy-Themed Crafts for Christmas Gift Giving
 How to Make Chocolate-Covered Strawberries for Kids: A Fun and Easy Recipe
 How to Make Easy Gummy Worms at Home | Homemade Candy Recipes
 How to Host a Candy-Themed Movie Night | Fun and Sweet Ideas